Taking it back to the old skool, cos I’m an old fool….For the past month or so our lives have been consumed with making lime putty. Processing quicklime and turning it into lime putty, ready to be mixed with sand just before it goes onto the walls of our straw bale house as render/plaster. An unusually high number of friends and family have been asking just why? Why didn’t we buy it ready made? Why are we using an old-fashioned process at all? Why are we putting citrus fruit on the walls of our house? Classic.
I want to try to answer some of these questions and demonstrate that the procedure is actually quite simple, as long as you are prepared that if at first you don’t succeed you should try, try again 😉 And most importantly try not to create a volcano in the process!
Lime render and plaster (outside and inside), is super awesome for straw bale houses for three main reasons. Firstly, when cured, it is a breathable substance, allowing the bales underneath to breathe also. This is particularly important for the bales, due to their natural composition, where any damp will lead to rotting. Secondly, lime plaster is a little repulsive to rodents, meaning if they really want to get through to our bales for nesting, they could be risking self-combustion to do so. Thirdly, lime is a natural substance and works out as a carbon neutral process once complete. It requires the use of carbon to extract the limestone from the earth and transport it, but an equal amount of carbon is then re-trapped into the lime itself as it reacts, cures and turns back into limestone.
Buying ready made lime putty is an option, but it costs about two thirds more when compared to making it yourself. Plus I heard making it at home is quite the grown-ups science experiment, so where’s the fun in buying it pre-made?!
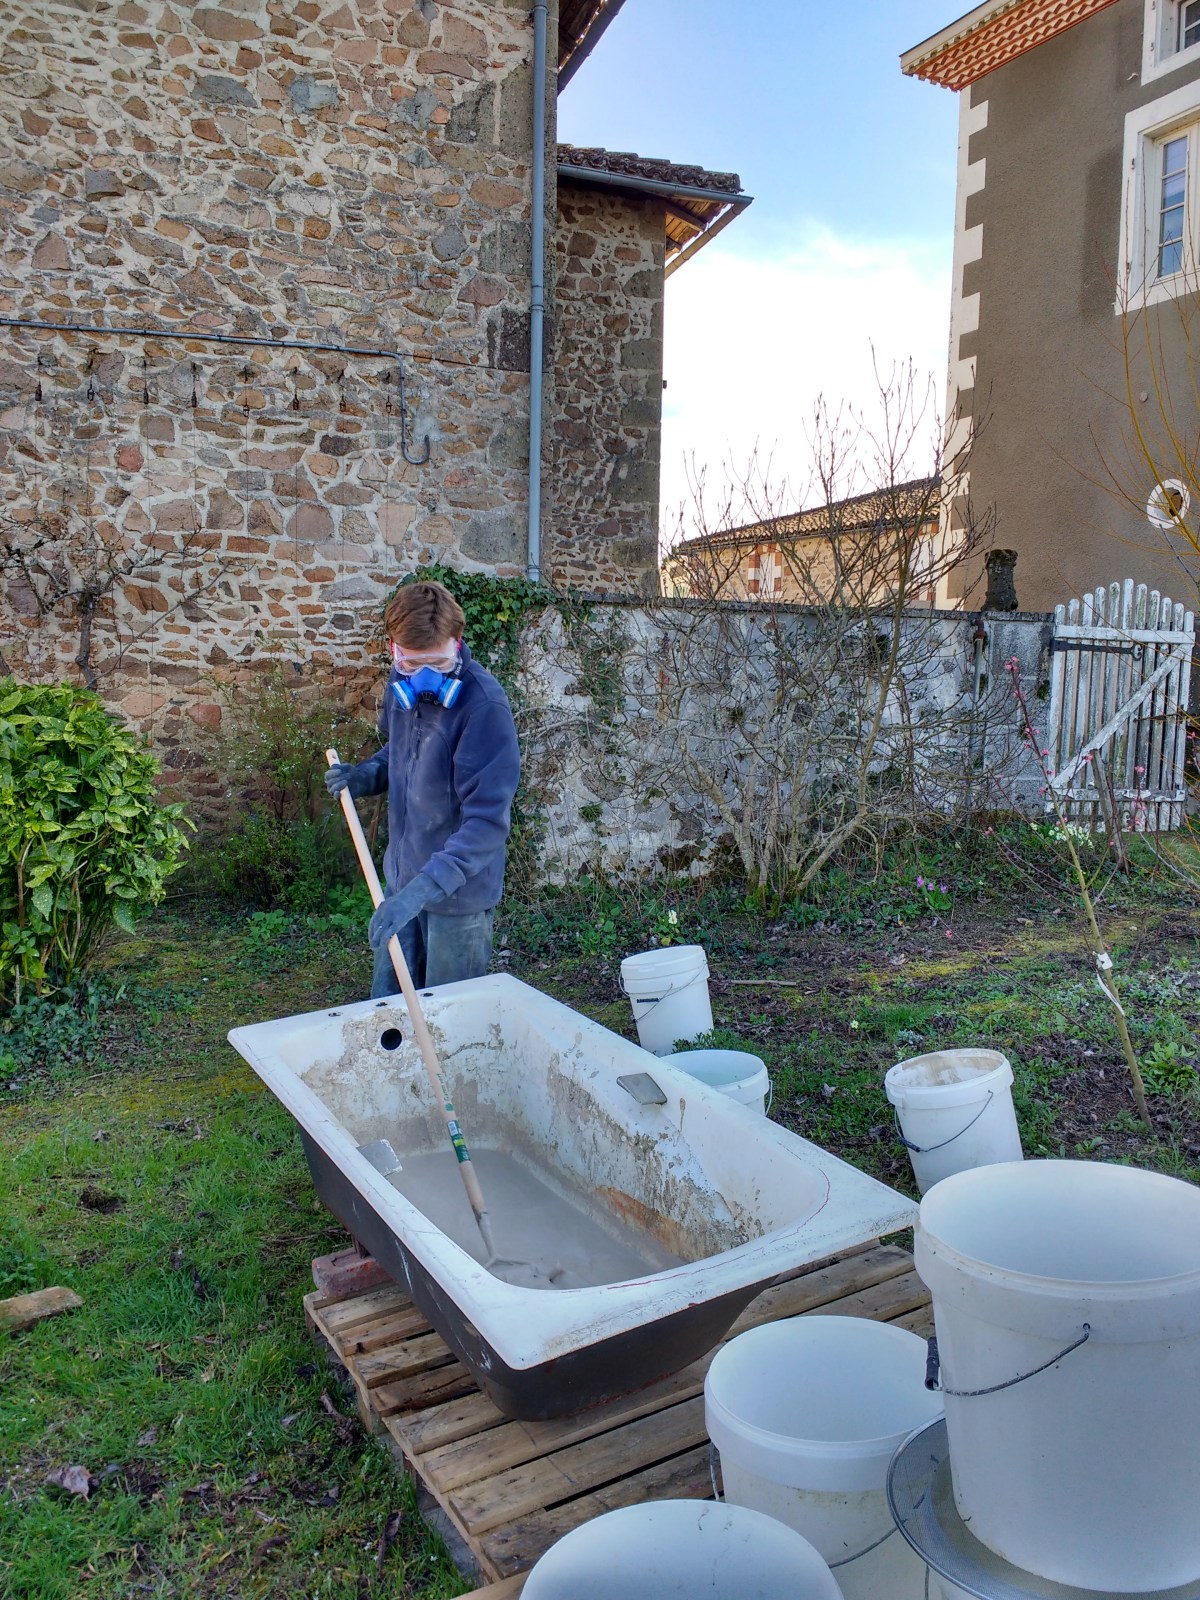
It turns out that ‘chaux vivre’ (we sourced our stuff here, thanks to a recommendation from Tamara) as it’s called in French, reacts in a different manner to the British stuff. Rather more powdery than the British counterpart, and so it needs less water to react. We were not aware of this to begin with and followed English instructions. This wasn’t too bad but we ended up with white water. Round two, and a after lovely phone call to our lime putty guru, Tamara, we were sure we had it right. Although perhaps a little over zealous, we added 4 x 25kgs bags of quicklime to the cast iron bathtub, along with what we now knew to be the correct amount of water (a ratio of 1: 1.16 quicklime to water), however we hadn’t quite worked out the capacity of the bathtub and quickly realised once the lime started to react properly that it was going to be like trying to control Mount Vesuvius in full force! Uh oh. That attempt over, it was a case of third time lucky. With only 2 x 25kgs and water, we found this to be a far more manageable size for our receptacle.
We were then free to slake the lime to our hearts content, which means agitating it to ensure it doesn’t drown and oxygen can reach all of the unreacted quicklime, we found it best to use a garden hoe or rake; slake – sleɪk/ – verb – gerund or present participle: slaking. 1. combine (quicklime) with water to produce calcium hydroxide.
Here is a short video with some highlights of our slaking trials and tribulations:


Once we had the process refined we were able to start getting through the 2 tonnes of quicklime we had to react. This should create roughly 4 tonnes of lime putty, all of which will cure for three months before usage.
We have enlisted some helping hands along the way and had endless support from our friends, Georgina and Richard, who very bravely allowed us to not only make the fiery stuff in their garden and even picked up the quicklime from the quarry, but also encouraged their wonderful children to get involved (bohemian dress and flip flops are a safety prerequisite; don’t worry, there were swimming/skiing goggles 😳).
In all seriousness, it’s a necessity to have protective clothing on because if the lime splashes onto the skin for any length of time it can burn, particularly when the bath tub is full to bursting with bubbling, 120 degree lime. Should this happen the best remedy appears to be a slathering of coconut oil on the skin. There’s a song here somewhere…
Many thanks to our lovely friend Linda for transporting the bathtub to our land, where we are continuing with the lime putty marathon!
*No children were harmed in the making of this blog/lime putty.

")
")
")
")
")

We still have a collection of three bathtubs from our build 🙂
Although I will say that whilst we wanted to use the same method we opted for bagged builders lime in the end due to cost and availability, and despite what you may read it works well and we have had no issues in the five years its been on the walls.
I look forward to reading more as you continue.
LikeLiked by 1 person
Hi Eddy! We could totally have moved along faster with another bathtub!
I think that Paul also used builders lime for his straw bale house and he said it was easier to work with. The lime we are using is really easy to get hold of here because a lot of the farmers put it on their fields and as a result it’s very reasonably priced. I will keep you posted… 😀
LikeLike
Pingback: The Splendour Of Render – Les Vignes Basses